
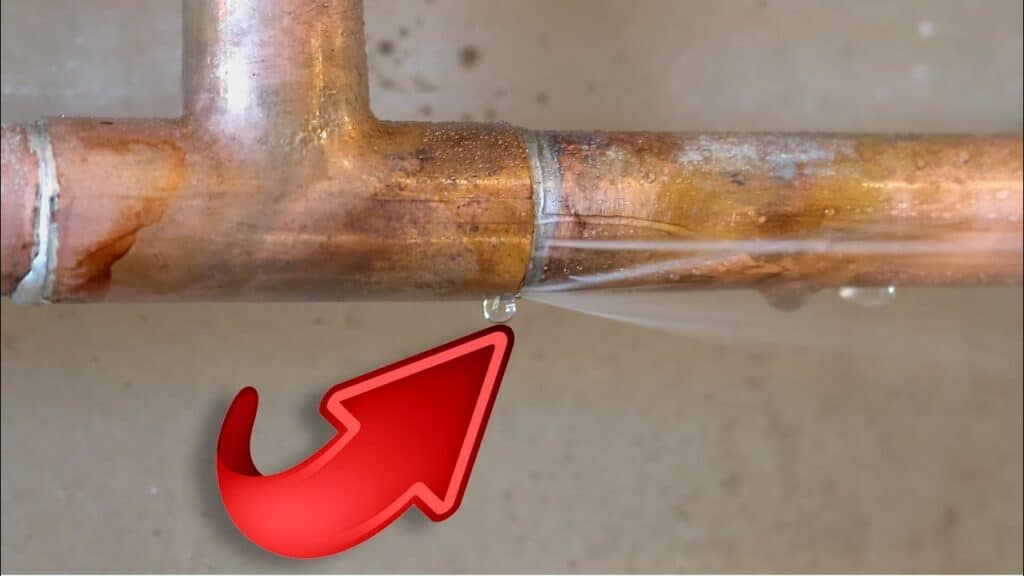
It doesn’t matter whether it is a PVC drain pipe or not, it’s annoying to operate with a leaky solvent weld joint. The joint is held together with the help of a solvent glue that enhances faster and permanent connection. However, repair could be problematic in case there is any leakage in the pipe or solvent joint.
Separating the joints can be a nightmare and therefore, sometimes you might end up cutting the pipe and installing new replacement parts and couplings. You don’t have to worry about anything, because we have carried out in-depth research to help you with that. Go through our article and everything will run smoothly.
There are several methods that one can employ to fix leaking solvent weld joints. We have tried our level best to equip you with not less than four different methods. The approaches involve simple tools and materials; without wasting much time, let’s explore these methods;
Contents
Methods Of Fix Leaking Solvent Weld Joint Quickly
Method 1: Using Silicone or Rubber Repair Tape
Silicone or Rubber repair Tape is usually a heavy-duty and sticky thick tape. On the other hand, the tape is a bit gummy and stretchy, to allow it to stretch out.
This is the most straightforward method that only requires a few materials and tools like utility knife or scissors, silicone or rubber tape. The tape works excellently on pipe cracks and sometimes on leaking solvent. Since you will be repairing a leaky joint, follow these steps for quick fix;
Step 1: Drying the tape
Under this step you are requested to utilize a clean piece of rag to wipe the joint down. Do so to ensure the pipe is dry and clean. The repair tape will only work excellently if it makes direct contact with the PVC plastic.
Step 2: Wrap with the tape
With your clean and dry pipe, wrap the tape tightly around the joint, stretching the wraps past the repair part on either side. The most exciting fact about a repair tape is that one can wrap it in a spiral format to enhance considerable distance. However, applying the tape in intricate spaces can be a bit challenging since you will be forced to cut a significant tape to thread it around carefully.
Step 3: Testing the repair
It’s now time to test the work done. It’s simple, you simply have to run water in the pipe and be watchful to observe any leak. If there’s no leakage, your job is done, but remember this isn’t a permanent solution.
Method 2: Using Fiberglass Wrap
Using fiberglass wrap can be another reliable solution and it’s usually a fiberglass covered with water-activated resin. The solution is most suitable for seal patching leaks in both leaky joints and pipe walls. To achieve better results, follow this procedure;
Step 1: Cleaning and dry you pipe
Take a clean piece of clean and wipe down the fittings to remove any moisture and residue. The surface should be free of any contaminant for the substance to work properly.
Step 2: Applying the Wrap
The next action will be to use a sizable fiberglass and wrap it on the problematic area. Furthermore, use the fiberglass fabric to tightly wrap it around the leaky joint. Remember, the wrap should extend to something like three inches on either side of the leaky area.
Step 3: Hardening the wrap
There’s nothing you can do here, but to give the wrap enough time to harden. The activated resin is the substance that will control this process and can take up to 20 minutes.
Method 3: Using Repair Epoxy
Using Epoxies can be another outstanding way to ensure your leaky solvent weld joint works smoothly. The substance bonds together the plastic parts in both liquid (syringe) and putty forms. If you have issues with your fittings, then this method can offer the best solution; you can stick and fix pipe crack.
Use the following steps to arrive at home;
Step 1: Cleaning and drying the pipe is inevitable
The first thing you should do is to ensure the fitting is dry and clean. The repair epoxy works well in a clean and completely dry pipe.
Step 2: Mixing the epoxy
You don’t have to worry about this step because the manufacturer has already directed you how to mix your epoxy patch. Generally, these substances require you to use a catalyst or a hardener to activate the patch material. However, those models that come in syringes tend to mix themselves whenever you press the plungers.
The syringe will then produce a liquid epoxy substance that’s dabbed on the problematic surface directly. On the other hand, some epoxies require manual mixing (hand-mixing) to have a putty-like substance that you can apply on the leaking surface with the aid of a putty knife. Based on this statement, Liquid epoxy tends to be thinner compared to putty and therefore can offer the best solution to leak solvent weld joints.
Step 3: Applying the epoxy
You will spend little time to mix the substance and therefore, the next thing will be to dab it on the leaky joint. During the application, you should correctly apply epoxy beads to the whole joint.
Step 4: Testing the art
Before arriving here, the prior action should be giving the artwork enough time to cure. You might be directed by the manufacturer on how many minutes to wait; approximately it can go up to 30 minutes or an hour to fully dry. The last action will be to run water through your pipe and observe for any leaks.
Method 4: Using Hose clamps and Rubber
The last method that can still help you to work on your leaking solvent weld joint is use of hose clamps and a thick rubber. Remember, it’s also a temporary solution that can hold on to your situation as you prepare for the permanent repair. Wrapping the rubber around the problematic surface is always advisable if the leakage is concentrated in one point.
Alternatively, bicycle tubes can do wonders to contain the problem. However, applying the rubber works well in smooth pipe sections for it to make a direct contact. Below is a complete guide;
Step 1: Cleaning the Pipe
Like the above approaches, cleaning the pipe is essential and you can do this with the help of a dry rag.
Step 2: Cutting the rubber patch
With the help of scissors, trim a sizable part of rubber based on the space you wish to cover. Properly place the patch on the problematic pipe and wait for wonders.
Step 3: Attaching Hose clamps
Position the clamps on the rubber patch and the pipe for better results. These clamps should tightly and directly hold both sides of the rubber.
Step 4: Testing the artwork
There is no a big deal under this step since it involves running water in the pipe and observing leaks. Your job is well done if there’s no leakage.
Related Content You Shouldn’t Miss: Fix Cracked Rim With JB Weld
FAQs:
- Can I connect compression to a solvent weld waste pipe?
Yes, they are very critical when it comes to compression fittings and they can accommodate any kind of combination.
- How long can a solvent weld joint take to dry?
Something like 20 minutes is enough, but giving it an hour can yield best results.
Final words
Leaking solvent weld joints should be a thing of the past with the help of the above approaches. We have offered you more than three methods since our preferences vary. Therefore, it’s time to get into the chamber and do it yourself; the procedures are straightforward to follow.