
I don’t know, maybe your engine block has developed some cracks and you are no longer having peace of mind. This situation happens like accidents in life and therefore you should be in a position to accommodate them. Failure to fix a cracked block with JB weld can result in leaking coolant or attracting air.
If you are one of the victims, then I would wish to assure you that handling the problem is possible. You can easily achieve this with the help of the JB weld. It’s simply a kind of epoxy that can seal and strengthen to cover the cracked area.
When we mix the hardener and the resin, there will be a sealant formed that can be utilized on the broken part. This article should therefore show you how to achieve this with the help of a simple guide. Let’s go straight to procedures.
Contents
Step by step guide on fixing a cracked block with JB weld

Before we kick off our healing procedure, it is advisable to have at hand some necessary materials or tools. There are some useful items that you don’t have to miss like a Dremel, JW weld, wire brush attachments, and hairdryer. Therefore without wasting time, let’s explore some of these steps;
Step 1: Place your car on a level surface
The first action you are advised to do is to park the car on a smooth surface. Remember to initiate the parking brake and then power off the engine.
Give the vehicle something like two hours for its engine to fully cool down. Or else, you may end up with unnecessary burns, caused by hot components of the vehicle. If you can’t for about two hours, then you can give it at least an hour.
Step 2: Locking hod in the place
Under this step, you are supposed to raise this component, locking it in place. Now, try locating the broken area on the block. It’s now time to take your wire brush and brush off the rust or paint around the cracked area.
While brushing, you should make sure the brushing covers an extra inch or two inches from the cracked place.
You should make sure there is a one-to-two inch cleaned area around the problematic area.
Step 3: Getting rid of brushed dust, rust, or paint

After confirming that the brushed space is enough, it’s now time to remove the dust, rust, or paint from the problematic area and the surroundings. Your mission should be to ensure the surface doesn’t have any kind of dust, rust, or paint that can ruin the fixing solution.
After removing the available brushed substances, wipe clean the area and apply a reasonable rubbing alcohol on a clean rag. Now, make sure you wipe down the whole area, including the cracked one. Don’t hurry to jump on the next step, instead give it a few minutes for the alcohol to work on the area and dry too.
If you are comfortable with the result, there is nothing left but to advance to the next step?
Step 4: Preparing the Epoxy
It’s now time to take the JB Weld and take out the hardener tube. Also, you should not forget to remove the resin tube. Achieving at this step is straightforward since you only requested to turn over the empty box and then squeeze half a resin tube in the box. Squirt the hardener tube halfway on the resin tube.
You can then go on and stir the resin and hardener together with the help of a stir stick until the epoxy mixture attains uniform color. This means that you will have to do it thoroughly so that you don’t end up getting worse results. After the mixture is evenly blended, don’t hesitate to move to the next step.
Step 5: Applying the mixture to the cracked surface
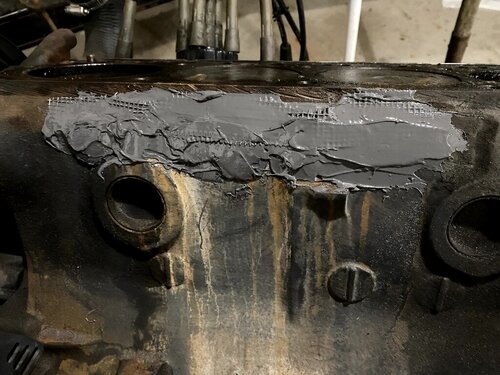
After preparing the epoxy mixture, the remaining step will be now to work on the problematic surface. Slip your flat scrapper beneath the epoxy and apply it over the crack first. Now, force down the scrapper to release epoxy on the crack.
Remember to start with the problematic place first before you concentrate on the surroundings.
On the remaining one inch-to-two-inch surrounds, apply the available mixed epoxy. The areas close to the problematic space should be fully coated with this mixed epoxy for incredible results. The scrapper should help you to achieve this accurately.
Step 6: Drying the treated area
This is a very significant job that you should consider, immediately after you’re through with applying the mixed epoxy on the cracked surface.
Therefore, experts suggest that it is advisable to leave the treated surface overnight. Doing so is necessary as it ensures the cracked area is fully hardened. Don’t hurry using the vehicle, unless you are sure about the status of the treated area.
Step 7: Inspecting the hardened epoxy
This should be the last step, indicating the success of your actions. You simply have to check the epoxy the following day, making sure it is fully hardened on the cracked surface.
You should also start the engine to allow it to heat up to an operating temperature. Continue observing the epoxy to ensure it sticks on the block and then power off the engine.
You might be interested to read also our other comprehensive articles:
Fixing Cracked Rim With JB Weld
Fixing A Gas Tank With JB Weld
Fixing Oil Pan Leak With JB Weld
FAQs:
- Can I really fix a cracked block?
Of course, everything is almost possible in this world based on how you perceive them. For this reason, you can weld the cracked surface or you can apply repair plugs in the crack.
However, many people would opt for block replacement since it is more common. Repair costs can be a bit higher, mostly when it comes to repairing engine block assembly.
- Can JB weld offer a permanent solution?
Well, I am not sure, but epoxy can offer an amazing solution. When the substances are excellently mixed together, they offer lasting, and strong to metal surfaces. More so, this approach is versatile as you can still apply it on various surfaces. While mixing, stick to a 1:1 ratio for it to establish a robust bond.
Remember, you can file, shape, tap, sand, and drill this place after curing. On top of that, the solution can accommodate up to about 55oºF temperature when it’s fully cured.
- Which one is stronger between the welding and JB weld?
“The Original Cold Weld”, which is JB weld, will only work best as a substitute for torch welding (traditional). The approach is meant to be enormously effective even in the demanding environments. However, you need to understand that this is a two-component epoxy that utilizes chemistry to develop the strongest bond.
- How much can I spend when fixing a cracked block with JB weld?
It’s not expensive and also the price is not fixed. It varies from one automotive to another based on their services. But, roughly you can spend up to $100 or more, mostly when replacing the entire assembly.
More so, whoever is handling the cracked block determines the amount you are likely to spend.
Final words
JB weld can offer a robust solution to a cracked block as long as you apply it correctly. The way you mix the epoxy will determine how strong the substance will be on the problematic surface.
To get more of this, hopefully, you have gone through our discussion. Everything will run smoothly since the steps are also straightforward.