
Cast iron is an essential metal that is widely applicable and preferable by many people. It has many benefits that include; it is strong and can last longer than any other metal. Despite being effective, it develops rust faster and requires maximum servicing and maintenance, such as keeping the metal in dry conditions away from moisture. But in case it becomes faulty, you can fix it.
You can fix the cast iron with JB weld by following some simple procedures. But at times, it can be challenging, especially if you lack understanding of how to weld the cast iron, and the only possible solution is to seek help from an expert. Before beginning any process, first, ensure you have all essential materials and will help you carry the whole process successfully.
Fortunately, the article below shows some steps to fix the cast iron using the J weld. In the end, there are some FAQs concerning the same and any additional information concerning the iron casting process. Review this article carefully and have a complete understanding of how to fix the cast iron, and don’t forget to review the manufacturer’s instructions if you want more information on how you can deal with the welding machine and the iron.
Contents
Steps of fixing cast iron with JB weld
You can weld the cast iron with the JB welding by following the steps below;
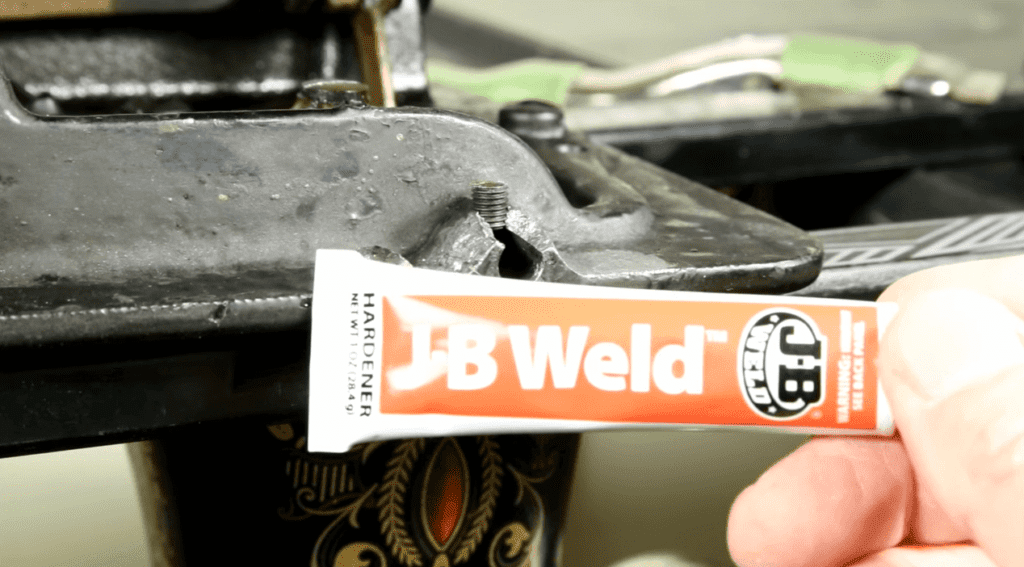
Step 1: Get the JB weld from the nearby selling store
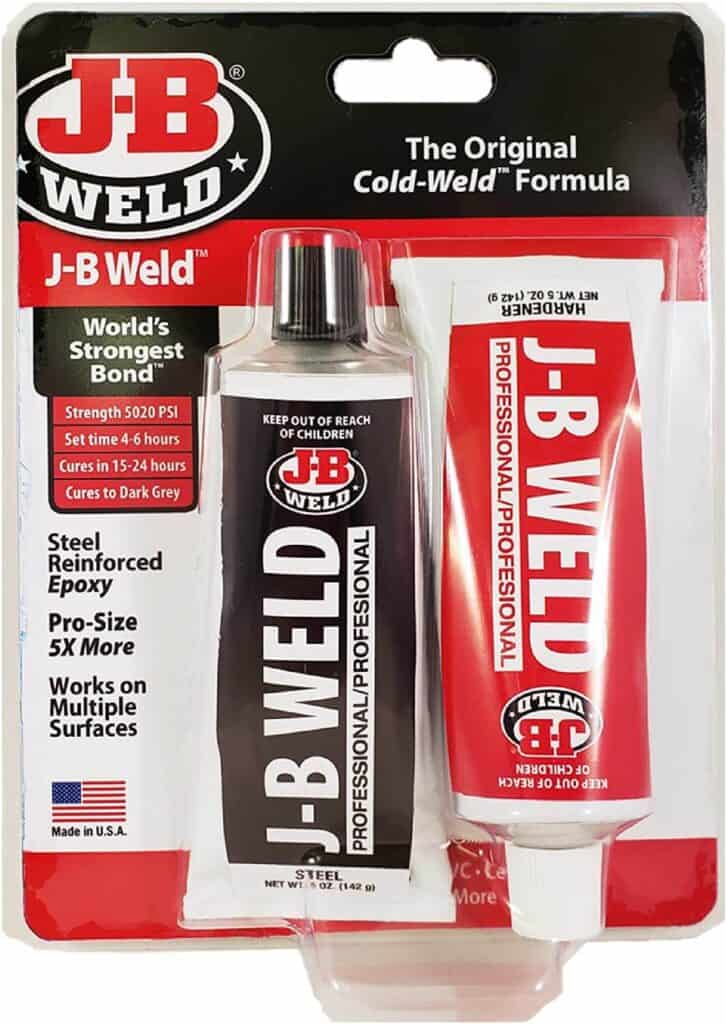
The fire step is to get the JB weld from any nearby store. Before purchasing the JB weld, consider some factors, such as evaluating the device’s cost. Also, consider the quality of the JB weld and buy one that can last longer without any damage or rust.
In addition to that, ensure the JB weld is according to your taste and suits your desires. Ensure you buy a tube of epoxy putty, which will function as a glue that will grasp the cat iron in position and fill the crack with something safe such as a secure seal.
Step 2: Collect all materials essential for the process
After getting all essential materials and before beginning the process, ensure you have all the necessary materials. The materials include the following;
- Water.
- A scrap of cardboard.
- Putty knife.
- Sandpaper.
- Rag.
- An epoxy putty such as a JB weld, among others.
Step 3: Remove all dust and rust present

The most recommended sandpaper is the 80-grit sandpaper, clean the surface and clear all rust and the paint present. The dust and dirt may be covering the crack if present and make it fail to function as usual. Ensure the surface of the cast iron is clean before fixing it.
While carrying out the process, ensure you use the back and forth motion to protect the whole cast iron. If you use a different activity, you may damage the cast iron and prevent it from functioning correctly. Finally, use the correct sandpaper that is working as recommended.
Step 4: Clean the surface using soap and water
After cleaning all dirt and dust from the cast iron, clean the iron using recommended tools such as; water, a rag that you can use to remove all dust and dirt present on the surface of the cast iron, and dish soap. Ensure you clean all places, including the surrounding areas.
Leave the iron for some time until it is completely dry before you proceed to the next step, and once you dry it completely, by squeezing some of the putties off the surface. Also, remember to follow the manufacturer’s instructions while carrying out the process.
Step 5: Fill the cast iron with the JB weld and squeeze the excess out
See the manufacturer’s instructions first and fill the hole present in the iron metal, if any, and make sure you squeeze them out on a surface that is not bending but flat. To carry out the process, use some tools such as a putty knife and a scrap of cardboard. Be careful with the knife to avoid injuring yourself.
Step 6: Spread the putty evenly on the iron
Using the JB weld, spread it evenly on the surface, especially if any cracks are using the putty knife. Remove the excess JB weld with the putty knife before it dries. After removing the excess putty, leave it for some time before handling your cast iron item. Be careful when scraping excess putty to protect the iron from any damage.
Step 7: Paint the cat iron
After finishing all the processes above, paint the iron to make it attractive. Paint it according to the desired taste and use the paint you want. If the function fails, seek help from a professional person or contact the original manufacturer for more information. Also, don’t forget to refer to the manufacturer’s manual guide.
You might be interested to read also our another comprehensive article of:
How To Fix A Gas Tank With JB Weld– Ultimate Guide
JB Weld To Fix Copper Pipe Leak- Complete Guide
Frequently asked questions:
- How can I fix cat iron using the cold metal stitching process?
Answer; Cold stitching is the best way of fixing a cracked cast iron that is difficult to repair using other methods. Follow the steps below to get the best results.
- The Cast Iron Crack’s Assessment
The first stage is to examine the fracture in the issue. The approach is best for cast iron items up to 1 centimeter thick. It makes no difference how long the fracture is. The location of the fracture will decide whether it is fixable or if a new iron cast part must be sole.
2. Make the holes using a drilling machine
position the openings must be evenly at periodic times. A guideline is necessary for precise cutting of the holes along the fracture for optimal results. The total number of rounds in the set must not always be there. The goal is to create vital sewing places to keep the broken cast iron intact.
3. Connecting the Holes in Columns
After you’ve drilled the sewing holes, you’ll need to sew them up. The holes will make it easy to enter the keys, which will help to strengthen the broken cast iron. To unite the holes by producing a slot in the steel, you’ll have to have a big wedge.
When the keys have been installed, the circular shoulders of the drilled holes will act as holding points. Maintaining the outer diameter of the drilled holes while connecting them is critical.
4. place the metal Stitches incorrect location
The iron keys are an essential part of this operation. They provide the necessary strength to hold the damaged sections together after the repairs. Cold metal stitching relies heavily on high-strength iron. Otherwise, you’ll have to repeat the operation because it might not be efficient the first time.
The iron keys will offer far strength across the whole surface of the cast iron as a result of this, avoiding future cracks. To make a firm bond, the drilled holes and iron keys should fit snugly together. Between the iron keys and the original component, there must be no play.
5. Sew the stitches together and remove excess materials.
After all the process above, finish by sewing the stitches and getting rid of the excess materials.
Conclusion
If you want to fix the cast iron with JB weld, follow the steps above carefully. Ensure you refer to the manufacturer’s instructions to resolve the issue on your own. Also, in case of any question, contact the original manufacturer for more information. In addition, avoid trying the process on your own if you are afraid to do it on your own.
Finally, take some precautions when using both the cast iron and the JB weld. First, always keep the iron clean and free from any rust, and the only way to do so is by keeping it in a dry place. Also, ensure the iron is pure before fixing it. Lastly, service the iron more often as required by the manufacturer.

