
It is essential to size welder circuits and wiring following the input current needs of the welder. The National Electric Code (NEC) specifies the wire diameters utilized for particular current demands in Table 310-16. In addition, a variable amount of current is required for various conductor sizes and insulation support configurations.
The size of the circuit breakers is determined by the amount of current required for the devices to function properly. For example, a 6-gauge wire that used a cable circuit must be able to handle the current permitted by a 50 amp breaker in addition to its other requirements. Wiring a 240-volt welder with a 40- to 50-amp input requires a 50-amp breaker as well as a 6-gauge wire.
This article will help you solve major issues related to wiring a 50 amp welder. You will find the steps to follow when wiring an amp plug for a welder and answer the frequently asked questions. In addition, you will find the different wire sizes needed when wiring your 50 amp welder. Follow the article keenly to get the best results.
Contents
Wire size needed for a welder

1. Wire conductor sizes
When using insulation, multiple conductor diameters and current capacities are supported. When it comes to current handling, the 8-gauge wire can manage up to 40 amps, whereas the 6-gauge wire can handle up to 50 amps.
2. The circuit breaker sizes
Typically, the size of circuit breakers is decided by how much current is required by the service devices. For example, when a gadget requires 27 amps, a 30-amp circuit breaker would protect it. When wiring a circuit, the gauge of wire that is utilized must also be large enough to accommodate the current that is permitted by the circuit breaker. For example, a circuit with a 20-amp breaker requires at a bare minimum 12-gauge copper wire.
3. Sizes of the welder circuits
Welder circuits or wiring should always be sized following the input current needs of the welder. In the case of 240-volt welders with 40- to 50-amp input current requirements, a 50-amp circuit breaker together with a 6-gauge wire will be required. Using an 8-gauge wire and 40-amp breaker when welding 30 to 40 amps of input power is necessary. It is possible to use ten gauge wires with a 30-amp breaker for small welders that operate below 30 amps of input current.
A 50 amp input stick welder could be utilized with a ten gauge wire and a 50 amp breaker on the same circuit due to Duty Cycle restrictions. A smaller 240-volt connection with ten gauge wire and a 30-amp breaker would be adequate for the vast bulk of home-size welders. Choose option 6-3 if the wall is accessible and can receive a full 50 amps, rather than option 3-2.
How to wire a 50 amp welder
Tools required wiring 50 Amp welders
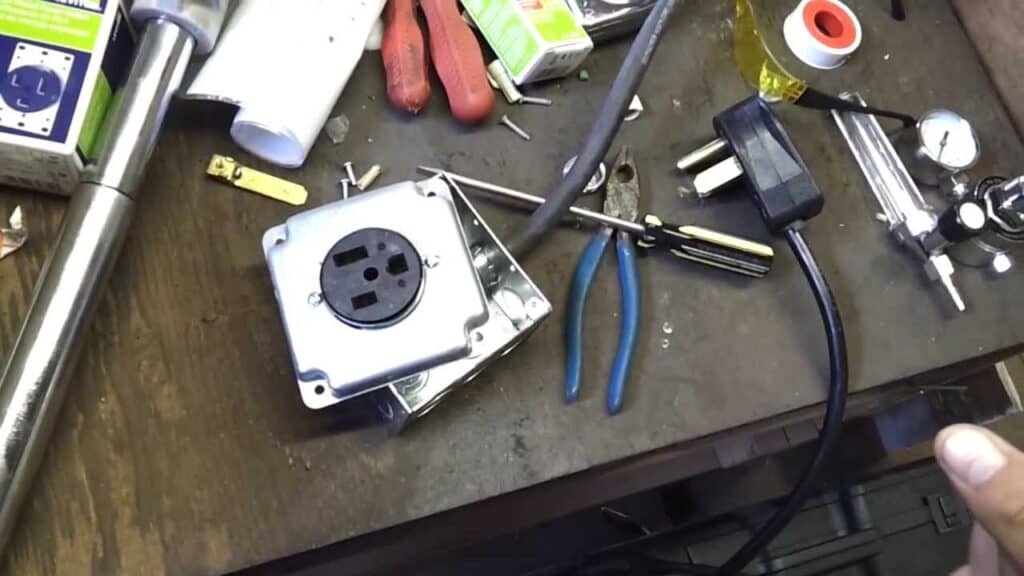
- Outlet cover
- A 6 AWG wire
- Non-corrosive adhesive/Insulation Tape (Red)
- Cable ripper
- 50 amp flush mount welder outlet
- Screwdriver
- Flush mount two gang box
- 50 amp two-pole breaker
- Wire stripper
- Red tape
Wiring a 50 amp plug for a welder

Step 1; always ensure safety
The performance of electrical work is among the most dangerous tasks that require strict safety precautions to be carried out safely. Ensure you have enough safety precautions in place before beginning the wiring. Because the human body is a conductive material, it is recommended that you put on your glasses first, then your gloves, and finally your shoes.
Step 2; ensure the ground is prepared to start the wiring
Remove your circuit box panel top and establish the grounds before doing any other work. It is important to remember to thoroughly clean the grounds after you have prepared them. After it has been thoroughly cleaned, run the wires through the box, then begin wiring the connector. First, insert the wire into the slots of the welding box, then tighten the little screws down to the wire.
Step 3; label the white wire
You can see the white wire that was previously hidden. Use red tape to label the item so that anyone who comes across it will identify it right away in the future. This is a classic safety mechanism for future applications, with a red label indicating a positive current flow, as indicated by the wiring color code. However, you would see white, yellow, and blue wires in the machinery, so make sure to label them correctly because mistakes in wiring might be dangerous.
Step 4; screw your plug, then wire your circuit breaker
Remove the plug from the box using a screwdriver and then replace it. Make sure you have a cover for the book. Afterward, connect the circuit breaker. Using the same method as the wiring plug, wire your circuit breaker. Keep in mind that the breaker is an essential component since it ensures safety in an overload. Now that both the red and black wires are connected to the breaker, it indicates that both are hot and set to be snapped in together.
Step 5; install your breaker and put it on the covers
Check the breakers once more to ensure that they are in the “off” state. Check it thoroughly. Push the breaker completely in to ensure that it is fully placed now that the ground is ready. After that, replace the panel cover on the box in the manner in which it was originally.
Step 6; carry out the final testing
Now that all of the settings have been completed, it is time to check to see if the circuit breaker is operational. First, connect the welder to the power source by turning on the power switch. Then, the welder’s power button will weld a test piece of metal to see how well it performs. Provided everything checks out, you should be fine to proceed.
Frequently Asked Questions:
- Does an 8-gauge wire handle 50 amps?
8 AWG can carry a limit of 70 Amps in the open air, or 50 Amps when used as part of a three-conductor cable system.
Conclusion
In conclusion, a circuit breaker’s size is often decided by the current required by the devices being protected. For example, a gadget that requires 27 amps would require a circuit breaker with a capacity of 30 amps. While this is happening, the wire gauge utilized for wiring a circuit must be large enough to accommodate the same current permitted by the circuit breakers.
A circuit with a circuit breaker rated at 20 amps will require a minimum of 12-gauge wire. As a result, for 220v welders, you will require at least a 30 – 40 amp circuit breaker; however, for smaller 115v welders, a 20 – 30 amp circuit breaker should be sufficient. Depending on the voltage of the three-phase system, you may require a 50-amp circuit breaker.
Installation of your welder becomes a breeze when you know how to connect the plug and the circuit breaker precisely. This comprehensive instruction on how to wire a 50 amp plug for a welder has been written most practically and straightforwardly possible. In addition to the welder for beginners, these steps will operate effectively. Anybody should operate a 50 Amp welder just with a few tools if they carefully follow the instructions in this article. However, bear in mind that you’re not comfortable with the process. Therefore, it is always a great idea to employ a professional.

